Dice grid from a photo with Python (IV) – Designing the GUI with Tkinter
This post is part of the Project: Create a grid of dice from a photo with Python and PIL
We can significantly enhance the user-experience through a GUI that will let us visualize a preview of the final result and browse through the folders of our system to find the pictures we want to send to the script.
In this post, I'll show you how to design a GUI with Tkinter, and in the next post, I'll show you how to create an stand-alone executable that you will be able to distribute and run without having Python installed in your computer.
Consider that this is a basic GUI and its meant to be useful as an introduction to Tkinter, but I'm not going to get into more complex tasks like making the window responsive or using themes to make it look better.
Personally, I choose to draw the expected GUI either by hand or using Inkscape. It's not necessary to make the previous scheme pretty or too detailed, but its important to make it clear where is going to be every part of the GUI and what is it going to do.
For this program, I prepared the next scheme:
First, we'll start by putting a title to our window by calling the
I'll avoid making the widgets responsive to the window size by disabling the
 And the code:
Now it has a title and it can not be resized, but to give some personality to our program we'll need an icon. Although Tkinter does have a
However, we can define our own
Where you'll replace
After defining the method, we must call it inside of
The window with the icon now looks like this:

Tkinter gives us three geometry managers that we can implement in our GUI:
Dividing it into a grid, we can think of the design the next way:

We now realize that we'll work with 3 columns and 5 rows in the design of our application.
As you can see, we start counting the rows and columns from zero, as we do with arrays, lists, and other iterable objects.
And if you pay attention to the scheme, there are three columns in every row, despite not all of them have three widgets.
This is because the number of columns is defined by the row that contains the greatest number of columns.
But don't get fooled: Tkinter won't let us use the space in a column if its predecessor doesn't exist in the row, i.e: We can't put a widget in the 3rd column if we don't have any in the 2nd column.
Despite this limitation, you can see widgets in the scheme that extend beyond its origin column, even covering all the columns, like the "Preview" label and the "Image" canvas, and that's not an error of the scheme. How's that possible? Thanks to the
Knowing this, nothing can stop us from coding our GUI using Tkinter and Python now!
And I'll start by creating the "Select file..." button calling the
If we don't call the
After running the previous code we can now see the button in the window:
As the
Following the scheme designed before, now it's time to add a label that will show the path of the opened file. We can do this with the
It is a good practice to declare all the variables of the class (or "attributes of the class" in OOP) close to the code where they'll be used or inside
Also, as this variable will be interacting directly with a widget of Tkinter, we'll need to declare it as an special Tkinter variable class:
Now we can build the
When calling the
After that, we'll have to add the TextBox needed to get the max amount of dice that the program will use to represent the picture. In Tkinter, the TextBox is called Entry and it needs to be binded to a variable to store the introduced value.
As I did with the path label, I'll go back to
When we are not going to handle a Tkinter widget after its creation, it is not needed to assign it to a variable. As we are going to bind the widget to the
So far, the window looks like this:
 Not bad, uh?
But the second row is still missing one element: The CheckButton that will indicate us if we are going to add a border to each die or not.
To be able to do that, we'll store the status of the CheckButton in a variable. As it can only have two states (True or False), we'll create a variable with the type
Then we'll add the CheckButton by invoking
Note how the CheckButton will execute a command every time it is clicked:
This method will update the preview when the CheckButton status changes, but we'll code it later. By now, we'll just declare it and bind it to the CheckButton.
Now the second row is complete, and thanks to the columnspan of the label widget of the previous row, it doesn't move when we add another column:

The next row will only include a label aligned at the center. To achieve that, we need to pass it a
And then, we'll add a Canvas where the preview will be displayed. A Canvas widget provides graphics facilities to Tkinter, like displaying pictures, drawing, etc, so it is the perfect widget for this task.
Our canvas' size will be 500x500px, it will have a black border of 1px and its background color will be "ghost white" (Tkinter color names).
As we will work with some methods of the Canvas object, we'll declare a variable containing the canvas.
 Finally, we only need to add the "Save Image" button. Again, we'll invoke the
Now the

All the buttons are clickable and we can write in the Entry widget but the program doesn't do anything yet!
It's time to fill the helper methods that will let us open files in the program, see a preview of the final result and process the image with the module we wrote in the previous post.
Coding the helper methods
While we coded the look of the app, we figured out that three functions are needed to handle the inputs.
Those were the following:
Starting with
We start by calling
This function will open a window that we can use to search for a file.
We can set an initial directory and filter the filetypes we are looking for, in this case, the window will show only JPEG and PNG files.
This function returns the path to the selected file, if Cancel is pressed, the filename is empty.
To avoid errors, the following code will only be executed if a filename exists. When the filename doesn't exist, the function will do nothing.
If a filename exist, then the value of
After that, we'll create a
Finally, we'll call
Here, we'll create a copy of the Image to perform on it the operations needed to create the preview.
After getting a copy we'll reduce its size to 500x500px using the
Then, we'll pass the resized image to the
Now we'll have to convert the
Finally, we'll draw the image in the canvas with the method
If you run the program, you should be able to open an image an see its preview.

And there's only method left:
Here, we'll contain everything inside a
After doing that I'll call the
If a filepath doesn't exist (i.e. The user pressed "Cancel") then nothing happens.
If a filepath exists then
The next four lines are required to valid the Image.save() parameters:
The filepath is saved as "/path/to/filename.extension" and as we explicitly have to indicate the extension of the file when calling
Before calling
With all that done, we can finally invoke
After saving the image, we can check that the file now exists in the indicated path and show a message indicating that the file was successfully saved, if it does not exists, then something wrong happened and we raise an Exception.
In this program I foresee three kind of exceptions:
And that's it! The program is complete :)
The whole code:
- The logic behind the program
- Drawing the dice
- Create a grid of dice from a photo
- Design of the GUI
- Documentation and creation of the stand-alone executable
Introduction
So far, we've been able to successfully create a dice grid from any picture using PIL and Python. However, running the script and modify the path to the picture every time we want to make a grid becomes tedious very quickly and its not the most friendly way to do the things.We can significantly enhance the user-experience through a GUI that will let us visualize a preview of the final result and browse through the folders of our system to find the pictures we want to send to the script.
In this post, I'll show you how to design a GUI with Tkinter, and in the next post, I'll show you how to create an stand-alone executable that you will be able to distribute and run without having Python installed in your computer.
Consider that this is a basic GUI and its meant to be useful as an introduction to Tkinter, but I'm not going to get into more complex tasks like making the window responsive or using themes to make it look better.
Before coding
I recommend to have a good idea of how you want your GUI to look before starting to write the code, otherwise the coding process can be a bit messy.Personally, I choose to draw the expected GUI either by hand or using Inkscape. It's not necessary to make the previous scheme pretty or too detailed, but its important to make it clear where is going to be every part of the GUI and what is it going to do.
For this program, I prepared the next scheme:
 |
| You can think of every element in the window as a widget |
Base template
Although there is not an standard Tkinter template to start coding our application, I suggest an Object-Oriented Programming approach to handle our functions, attributes and components of the windows in an easier way:First, we'll start by putting a title to our window by calling the
title() method and passing an string to it. I'll call it "PyDiceGrid".self.parent.title("PyDiceGrid")I'll avoid making the widgets responsive to the window size by disabling the
resizable() method on the x and y axis:self.parent.resizable(False, False)Adding the icon
So far, the window look is similar to this:
Now it has a title and it can not be resized, but to give some personality to our program we'll need an icon. Although Tkinter does have a
root.iconbitmap() method to define the icon of our window, it just simply doesn't seem to work with the latest versions of Python and Tkinter, raising the following error:TclError: bitmap "icon.ico" not definedHowever, we can define our own
set_icon() method to define the icon of the window (Taken from Stack Overflow)Where you'll replace
icon.gif with the icon of your choice. Remember to write the full path of the file if it is not located in the same directory as your script.After defining the method, we must call it inside of
__init__()The window with the icon now looks like this:
Drawing the GUI with the grid geometry manager in mind.
Now that we've taken care of the basics of the GUI we can start drawing the window itself, based on the scheme I showed before.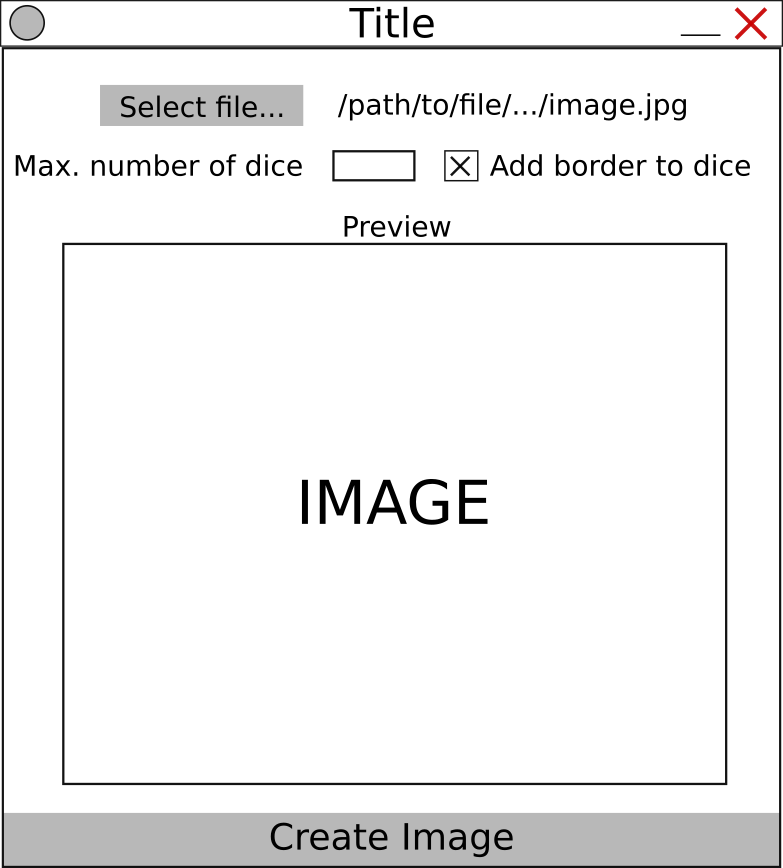 |
| I aim to create a window similar to this |
- Pack: Which stacks the widgets in our app as we code them. It's the easiest and quickest way to create a GUI but also it's not very customizable and can result in ugly GUIs.
- Grid: The most flexible geometry manager in Tkinter, it divides the window in a grid and we can add widgets by selecting rows and columns where they will appear.
- Place: With this geometry manager we must explicitly set the position of every widgets, based on its x and y axis.
Dividing it into a grid, we can think of the design the next way:

We now realize that we'll work with 3 columns and 5 rows in the design of our application.
As you can see, we start counting the rows and columns from zero, as we do with arrays, lists, and other iterable objects.
And if you pay attention to the scheme, there are three columns in every row, despite not all of them have three widgets.
This is because the number of columns is defined by the row that contains the greatest number of columns.
But don't get fooled: Tkinter won't let us use the space in a column if its predecessor doesn't exist in the row, i.e: We can't put a widget in the 3rd column if we don't have any in the 2nd column.
Despite this limitation, you can see widgets in the scheme that extend beyond its origin column, even covering all the columns, like the "Preview" label and the "Image" canvas, and that's not an error of the scheme. How's that possible? Thanks to the
columnspan attribute, that allows us to indicate how many columns will cover one widget, in this case, the "Path to file" label is set in the 1st column with a columnspan of 2 columns, and the "Preview" label, the "Image" canvas and the "Create Image" button all are set in the 0th column with a columnspan of 3, covering the whole x axis of the window.Knowing this, nothing can stop us from coding our GUI using Tkinter and Python now!
Coding the GUI
Time to draw the GUI with Python and Tkinter. I prefer to contain all the GUI elements (Buttons, Labels, Treeviews, etc) in one single method that will be called inside of__init__().And I'll start by creating the "Select file..." button calling the
ttk.Button() method. The button will belong to our main window (self.parent) and will action a method called self.open_file() that I haven't coded yet.Note: Passing the root window is something needed in every widget, as I won't be using any frames and I'll add everything to self.parent, I'll stop mentioning that step.After that, I'll add the button to the grid in the row 0 and column 0, with a padding in the x and y axis of 5 pixels. Also, I'll make it "stick" to the "East", which in Tkinter means it will be aligned to the right side of the column.
If we don't call the
grid() method after creating an element, it will not be displayed. It is important to be careful with this!After running the previous code we can now see the button in the window:
 |
| Unless specified, the size of the window will adapt to the widgets in it |
self.open_file() method hasn't been coded yet, the button doesn't do anything, but you can already see how we are drawing the GUI step by step.Following the scheme designed before, now it's time to add a label that will show the path of the opened file. We can do this with the
ttk.Label() method, that can work dynamically if we bind it to a text variable to it, that way we can change the text displayed by the label every time the user opens a different file.It is a good practice to declare all the variables of the class (or "attributes of the class" in OOP) close to the code where they'll be used or inside
__init__() by default. As we need the variable to exist before init_interface() runs, I'll define it before we invoke the method.Also, as this variable will be interacting directly with a widget of Tkinter, we'll need to declare it as an special Tkinter variable class:
StringVar() (You can read more about variable classes in Effbot)Now we can build the
ttk.Label() object and attach the self.path variable to it. As the displayed text will depend of self.path, I'll leave the text attribute empty, the label will have a width of 60 letters and the text will be wrapped if it get's longer than 300 pixels.When calling the
grid() method, I'll put it in the row 0 and the column 1, so it will appear right besides the "Select file" button. Notice how I already added, columnspan=2 because even if it won't make any difference until we add more columns to the grid, I know it will be needed later to display the label correctly, thanks to the scheme I drew before.After that, we'll have to add the TextBox needed to get the max amount of dice that the program will use to represent the picture. In Tkinter, the TextBox is called Entry and it needs to be binded to a variable to store the introduced value.
As I did with the path label, I'll go back to
__init__() to declare the variable that will be another Tkinter special data type: IntVar(), which is used to store integer values on Tkinter.When we are not going to handle a Tkinter widget after its creation, it is not needed to assign it to a variable. As we are going to bind the widget to the
self.num_dice variable, I'll pass it as the textvariable parameter for the widgetSo far, the window looks like this:

But the second row is still missing one element: The CheckButton that will indicate us if we are going to add a border to each die or not.
To be able to do that, we'll store the status of the CheckButton in a variable. As it can only have two states (True or False), we'll create a variable with the type
tk.BooleanVar() that, as you guessed, its the Tkinter variable type equivalent to a boolean.Then we'll add the CheckButton by invoking
ttk.CheckButon() like this:Note how the CheckButton will execute a command every time it is clicked:
self.preview()This method will update the preview when the CheckButton status changes, but we'll code it later. By now, we'll just declare it and bind it to the CheckButton.
Now the second row is complete, and thanks to the columnspan of the label widget of the previous row, it doesn't move when we add another column:

The next row will only include a label aligned at the center. To achieve that, we need to pass it a
columnspan=3.And then, we'll add a Canvas where the preview will be displayed. A Canvas widget provides graphics facilities to Tkinter, like displaying pictures, drawing, etc, so it is the perfect widget for this task.
Our canvas' size will be 500x500px, it will have a black border of 1px and its background color will be "ghost white" (Tkinter color names).
As we will work with some methods of the Canvas object, we'll declare a variable containing the canvas.

ttk.Button() method and we'll bind it to a command that I'll call self.run(), and by sticking the button to "W" and "E" at the same time, it will cover all the columns as long as its columnspan allows it.Now the
init_interface() method is complete and its helper methods exist, and the code looks like this:
All the buttons are clickable and we can write in the Entry widget but the program doesn't do anything yet!
It's time to fill the helper methods that will let us open files in the program, see a preview of the final result and process the image with the module we wrote in the previous post.
Coding the helper methods
While we coded the look of the app, we figured out that three functions are needed to handle the inputs.
Those were the following:
Starting with
self.open_file():We start by calling
askopenfilename() from the tkinter.filedialog module.This function will open a window that we can use to search for a file.
We can set an initial directory and filter the filetypes we are looking for, in this case, the window will show only JPEG and PNG files.
This function returns the path to the selected file, if Cancel is pressed, the filename is empty.
To avoid errors, the following code will only be executed if a filename exists. When the filename doesn't exist, the function will do nothing.
If a filename exist, then the value of
self.path will be set to it, that way our Label widget will update and show the selected filename.After that, we'll create a
PIL.Image object that will be stored on self.photo. Later, we'll perform the operations needed to get the dice grid on this object.Finally, we'll call
self.preview():Here, we'll create a copy of the Image to perform on it the operations needed to create the preview.
After getting a copy we'll reduce its size to 500x500px using the
Image.thumbnail() method, that way we'll keep the original ratio of the image, avoiding distortions.Then, we'll pass the resized image to the
img_to_dice() function. If the CheckButton we coded before is marked on, then the border value will be True, otherwise, it will be False.Now we'll have to convert the
Image type to a ImageTk.PhotoImage, needed to display images on Tkinter, but before doing that its values will be stored in the w and h variables, as we'll need them to center the image in the canvas.Finally, we'll draw the image in the canvas with the method
create_image(), passing the desired position and the image as parameters.If you run the program, you should be able to open an image an see its preview.

And there's only method left:
self.run(), which is basically the same as the preview but with the original Image object instead of a resized copy:Here, we'll contain everything inside a
try block because there are some exceptions that could happen while running this part of the code.After doing that I'll call the
asksaveasfilename() function from tkinter.filedialog; its behavior is very similar to askopenfilename(), but will return the path where we'll save the file instead of opening a file.If a filepath doesn't exist (i.e. The user pressed "Cancel") then nothing happens.
If a filepath exists then
img_to_dice() is called performing over self.photo and the result will be save in output.The next four lines are required to valid the Image.save() parameters:
The filepath is saved as "/path/to/filename.extension" and as we explicitly have to indicate the extension of the file when calling
Image.save(), we'll separate it from the filename with str.split(). This will return a list from which we'll store the last element (which must correspond to the extension) in extension. After that, we'll change it to uppercase as is required by Image.save().Before calling
Image.save(), we still have to check if the extension is "JPG" or "JPEG" as Image.save() doesn't support the former spelling.With all that done, we can finally invoke
Image.save() and pass the filename and extension as parameters.After saving the image, we can check that the file now exists in the indicated path and show a message indicating that the file was successfully saved, if it does not exists, then something wrong happened and we raise an Exception.
In this program I foresee three kind of exceptions:
- AttributeError, that should happen when the Save Image button is pressed without selecting an image first.
- ValueError, that could happen when a float is passed instead of an integer.
- tk.TclError, that should be raised when a string is passed instead of an integer in the Entry widget.
And that's it! The program is complete :)
The whole code:


Comments
Post a Comment